Showing posts with label .NET Application Development. Show all posts

31 December 2017

readonly fields in C# class

C# language has a keyword to mention fields in a class can be readonly. In this tutorial let's discuss readonly keyword and how it can be used to convey class author intention that a field value shouldn't be modified once the class instance is created.

C# sample demonstrating readonly keyword

public class Employee
    {
        private readonly string _id;
        public string _deptId;

        public Employee(string id)
        {
            _id = id;
            DeptId = deptId;
        }

        public string ID
        {
            get
            {
                return _id;
            }
        }
        
        public string DeptID
        {
           get
             {
               return _deptID;
             }
           set
             {
              _deptID =value;
             }
         }
    }

Notes on above C# program

  1. "_id" has been declared as readonly.
  2. "_id" member has been assigned a value inside the Employee class constructor.

readonly class members and value assignment

  1. With readonly members properties, you can assign value only during initialization and inside the class constructors.
  2. If you try to assign value to members anywhere else, you will get the below error:

    A readonly field cannot be assigned to (except in a constructor or a variable initializer)

When to define readonly fields in a class

If a member of a class whose value you(class author) don't want anyone to change post object construction, then consider marking that member as readonly.

By declaring a member as readonly you are indicating to other fellow developers that such member value cannot be changed once the object is created (post constructor call).

16 November 2017

blocking collection in .NET to implement easy concurrent queuing

In the last post I talked about using ConcurrentQueue to implement thread-safe queuing. In this blog post, you will learn about BlockingCollecton which makes it further easier to implement thread-safe queuing.

While reading items from the queue, we usually use while loop to keep reading messages. Now let's look at such a queuing example with ConcurrentQueue.

ConcurrentQueue<Message> queue = new ConcurrentQueue<Message>();
while (!cancelled)
   {
     Message item = null;
     if (queue.TryDequeue(out item))
     {

      // Logic to process the item
      // goes here.
     }

   }

The while loop keeps trying to read the message until its canceled.The thread running the loop will be consuming CPU all the time, even if there are no messages, which is not definitely a good thing.

To reduce CPU overhead with while loop logic to dequeuing the messages, we can take advantage of BlockingCollection introduced in .NET 4.0

What is BlockingCollection

  • BlockingCollection is from "System.Collection.Concurrent" namespace.
  • BlokcingCollection is thread-safe collection.
  • Use BlockingCollection class GetConsumingEnumerable() method to get the IEnumerable. You can use foreach loop around GetConsumingEnumerable() method.This for-each loop will iterate in a loop as long as items are present in it. If not GetConsumingEnumerable will get blocked until an item added to it. That is reason its called BlockingCollection.
  • By default BlockingCollection acts as a ConcurrentQueue i.e., thread-safe, FIFO collection.
  • Similar to Queue, you can keep adding items to BlockingCollecton from mutiple threads. In another thread you keep removing the items via GetConsumingEnumerable() method.

Code using BlockingCollection

BlockingCollection<Message> collection
new BlockingCollection<Message>();

// If not items in blocking collection, 
// the call will get blocked here
foreach(Message message in 
           collection.GetConsumingEnumerable())
 {
                
 }

14 November 2017

concurrent queuing in .NET

If you have built a queuing functionality in .NET app, it's most likely that you would have used Queue class from System.Collection.Generic namespace. The Queue collection has EnQueue and DeQueue methods. The Enqueue method adds an item to queue & Dequeue method removes the item from the queue.

Issues with Queue class from System.Collections.Generic

However, the Enqueue and Dequeue methods aren't thread-safe. It means in a multi-threaded scenario when one thread sees there is an item in the queue and try to Dequeue it, the item might have been removed by another thread; in such situation, InvalidOperationException will be thrown saying "Queue is empty."

static object syncObject = new object();
        static void Main(string[] args)
        {
            Queue<Message> queue = new Queue<Message>();
            while (true)
            {
                if (queue.Count > 0)
                {
                    lock (syncObject)
                    {
                        try
                        {
                            Message item = queue.Dequeue();
                            
                            // Logic to process the item
                            // goes here.
                        }
                        catch (InvalidOperationException ex)
                        {

                        }
                    }
                }
            }
        }

Solution using ConcurrentQueue from System.Collections.Concurrent namespace

To avoid getting such an invalid operation exception on trying to remove a nonexisting item in the queue, you can opt for ConcurrentQueue from the System.Collections.Concurrent namespace. Concurrent Collection were newly added in .NET 4.0 framework.

The ConcurrentQueue class has TryDequeue() method, which will not throw an exception when queue is empty, instead, the method will return false.

static void Main(string[] args)
   {
   ConcurrentQueue<Message> queue = new ConcurrentQueue<Message>();
            while (true)
            {
                Message item = null;
                if (queue.TryDequeue(out item))
                {

                    // Logic to process the item
                    // goes here.
                }

            }
   }

Advantage of using ConcurrentQueue over Queue

  • ConcurrentQueue is from System.Collection.Concurrent, so its thread safe.
  • ConcurrentQueue has TryDequeue() method which will return false when collection is empty and doesnt throw exception. As you know Exceptions are costlier, hence code with ConcurrentQueue will perform better compared to Queue in multithreaded scenario.
  • Without the try-catch block around TryDeque() method, the code logic with ConcurrentQueue is simple and easy to read.

Conclusion

If you are on .NET 4.0, it always better to use ConcurrentQueue compared to Queue. This is because ConcurrenrQueue will perform better in multithread envrionment. Nowadays its quite hard to assume an app which are not multi-threaded, so you can always use ConcurrentQueue going forward.

06 November 2017

partial class practical use case with web service proxy regeneration

Problem statement

Recently one of my friends has to regenerate the proxy classes added via Visual Studio Add Service Reference option to an ASMX WEB service. After regeneration of the proxy classes, he started getting "HTTP Error 401 - Unauthorized" error.

Temporary solution

He called out for a help. After looking carefully into the proxy file, we found that the manually added code in the reference.cs file was got overwritten with proxy class regeneration.

The error "HTTP Error 401 - Unauthorized" indicated that authentication details are perhaps missing while making a request to web service. But we couldn't find any authentication details passing code in the latest reference.cs file. Later we checked into File History, there was a difference. The authentication related methods were not present in the latest proxy class reference.cs file.

After we added the method to include the missing authentication details, the call to web service method started working.

Auto generated web service proxy with manually edited code

It overrides the GetWebRequest() method in the same auto generated proxy class.

protected override WebRequest GetWebRequest(Uri uri)
 {
     string authInfo = "authenticaiton";
  HttpWebRequest request = (HttpWebRequest)base.GetWebRequest(uri);
  request.Headers.Add(HttpRequestHeader.Authorization, authInfo);

  return request;
}

Permanent solution

Proxy generation happens all the time when the corresponding web service undergoes change. So, the proxy generation was recurring process and whenever proxy generation we would be sitting and fixing the same errors caused by manual changes overwriting issue.

We ought to find out a permanent solution so that all the issues with web service proxy regeneration can be put to rest.

Here partial classes in C# came to our rescue. Added a new partial class and in that partial class, included all the code we were manually adding to proxy class after it got regenerated.

New code looked like below:

namespace SameNamespaceAsThatOfProxyClass
{
  public partial class SameClassNameAsThatOfProxyClass
  {
   protected override WebRequest GetWebRequest(Uri uri)
   {
  string authInfo = = "authenticaiton";            
  HttpWebRequest request= (HttpWebRequest)base.GetWebRequest(uri);
  request.Headers.Add(HttpRequestHeader.Authorization, authInfo);
  return request;
    }
  }
}

From that point onwards, whenever web reference proxy classes were regenerated, we never faced the problem of manual code being overwritten issue. As the classes were being different, the manually added was never overwritten when the web reference proxy classes regenerated.

05 November 2017

viewing c# language ver used in a project

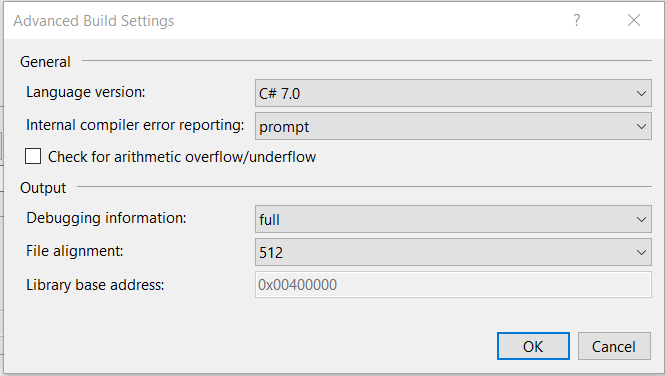
Have you ever wondered what is the C# language version used in your C# .NET project. You might have not worried about it because the version of the C# version used depends on the .NET framework version you have used for the project. In this blog post let's see how to view and change the C# version for the project.

How to view & change c# language version

  • Right click on the .NET project in visual studio and choose Properties.
  • In the left navigation tree, click on the "Build" tab. And browse to the end of the screen and click on the "Advanced..." button.
  • By default Language Version is "default", meaning it uses major C# language version. In the case below as you can see in the image, "default" means "C# 7.0".
  • 02 November 2017

    viewing registry keys used by an application

    You can easily view registry keys used by an application via tool called Process Monitor from Microsoft Sysinternals.

    Launch the Process Monitor. Click on the Filter menu item in the toolbar.


    Set the filter to match below. Where PID is application Process ID for which you want to see the registry keys.


    Then Process Monitor will start showing the registry keys accessed by the application, as and when such event happens.

    12 November 2016

    Effect of exceptions while initializing the static members

    Recently I encountered an error saying The type initializer for class threw an exception from a .NET windows service. The error was thrown while accessing any members/methods of a class. The error kept happening until the .NET Windows service was restarted.

    After digging deeper into application error logs and analyzing the code in depth, I learnt the below:

    1. The offending class had static variables. One of the static variables was getting initialized by invoking DB repository method to get configured value.

      private static decimal minInsurancePremuimAmount = InsuranceConfigRepository.GetMinPremuimAmount();
    2. The database repository method was throwing exception when failed to fetch the data from Database Server in case of any transient error,etc.

      try
      {
      }
      catch(Exception ex)
      {
        // Log and throw the exception
        throw ex;
      }
    3. When the offending class was first accessed, .NET framework tried to initialize the static variables. When it tried to initialize the minInsurancePremuimAmount, it resulted in a SQLException because Database server was not accessible at that time.
    4. So .NET framework could not complete the class initialization logic. Hence application was giving the error until it restarted.

      The type initializer threw an exception.

    What was the fix?

    1. So taking clue from the issue, code changed to ensure static members initialization logic will never throw the exception up the call stack. In case of any errors happened during the static members initialization, such Exceptions just eaten and logged for DEBUG purposes.
    2. In the offending class, the internal logic was modified.

      Before accessing such static members, the members were NULL checked. If they were still NULL, the code was added to initialize the variable.

      This way even if there is an exception, only the current method invocation would fail, but not any future method invocations will result in the error "type initializer threw an exception".

    18 June 2016

    before increasing the SQL Connection pool size

    If you are using ADO.NET technology in data access layer you might have encountered error saying, MAX POOL REACHED.

    The timeout period elapsed prior to obtaining a connection from the pool. This may have occurred because all pooled connections were in use and max pool size was reached.

    When you see that the error in your application logs, the natural reaction is to, try increasing the connection Max Pool Size in the SQL Connection string. But that isn't always right approach to deal with the issue.

    <add key="DBConnectionString" value=" Data Source=DBServer,port;Initial Catalog=DatabaseName;Integrated Security=true;Max Pool Size=??" />

    Let's stop and think for a while

    Before increasing the MAX Pool Size in the SQL Connection String, give a thought on the below points:

    1. When you don't specify the "MAX Pool Size" setting explicitly in the SQL Connection string, the default value is 50. i.e., already your application is configured @ Max Pool Size of 50 SQL connections.
    2. Then to ask yourself a question, does your app(single instance) really need approximately 50 simultaneous connections with Database?. If your application (single instance) is not dealing with such volume of data access operations, it more likely that you have got SQL Connection Leak problem.

    Deciding on the approach to deal with Max Pool Reached error

    Increasing the Connection Pool size

    If your application (single instance) does really need high number of data access operations, tuning up-to more than 50 simultaneous connections with Database, then to be on safer side, try to increase this value to a sufficiently large number.

    <add key="DBConnectionString" value=" Data Source=DBServer,port;Initial Catalog=DatabaseName;Integrated Security=true;Max Pool Size=100" />

    ** In the above case, the Max Pool Size has been increased from default 50 to 100 simultaneous connections with Database.

    Fixing the SQL Connection Leak issue

    If you are getting max pool reached error & if you think your application isn't dealing with such a higher number of simultaneous data access operation; then you might have got SQL Connection Leak issue in your application code. In that case, continue reading the post further.

    What is a SQL Connection leak?

    When you open a Database connection, you are required to ensure that connection gets closed once you are done with your data access logic. If, in any of the code execution flow, including exceptions scenarios, if database connections are not closed then its referred as Connection Leak issue.

    When number of Database Connection Leaks reaches the MAX POOL SIZE, then your application call to OPEN SQL Connection will result in "MAX POOL SIZE REACHED" exception.

    So solution is to close the opened SQL connections without a miss and also most importantly to close the connections as soon as possible.

    How to fix SQL Connection leak

    • With SqlCommand.ExecuteNonQuery

    11 June 2016

    why and when windows service went down

    If you have worked on developing Windows Service application, you might have thought about, is there any better way to know when and why a service went down unexpectedly. If that is your case, continue reading. This blog post aims to discuss one of the way, in which you can catch why and when windows service went down.

    Whenever you start a .NET application, it runs in an AppDomain. You are free to create a new AppDomain depending on the need for your application. Windows service built on .NET(System.ServiceProcess.ServiceBase) also runs in an AppDomain. All the assemblies loading and unloading happens with a given AppDomain.

    AppDomain object exposes an event called "UnhandledException". This event will be fired whenever there is an exception which is not handled in your application code.

    One of the main reason why windows service unexpectedly goes down is because of an Exception which is not handled. If exceptions are not handled, then they traverse go up the stack trace and kill the process. When that happens, the current AppDomain event get notified before application goes down.

    So, AppDomain's UnhandledException event can be used to get notified of any such unhandled exception.

    Steps to get notified via AppDoman UnhandledException event

    FIRST, subscribe to the UnhandledException event inside the Windows service Startup code. Do this as early as possible, so that you will also get notified of any exceptions happened even during service startup.

    static void CurrentDomain_UnhandledException
    (object sender, UnhandledExceptionEventArgs e)
    {
    try
      {
        string errorType = e.IsTerminating ? 
        "ServiceShutDownError" : "UnhandledExceptionError";
        Exception exception = e.ExceptionObject as Exception;
        if (exception == null)
        {
         Exception comException = 
             new Exception(e.ExceptionObject.ToString());
         // This is com Exception. 
         // Invoke your PRODUCTION support team alert
        }
        else
        {
         // log exception
         // Invoke your PRODUCTION support team alert  
        }
      }
       catch
      {
        // do nothing. don't want to intervene 
        // in normal UnhandledException event flow
       }
    }

    The UnhandledExceptionEventArgs object has two properties.

    1. ExceptionObject. This give details about unhandled error happened in the application appdomain which caused this event to fire.
    2. IsTerminating. Indicates whether the common language runtime is terminating. If true, the windows service will shut down.

    Caveats of this approach: Doesn't catch StackOverFlowExeption

    Ran small console application to see whether UnhandledException event will be fired in case of OutOfMemoryException or StackOverFlowExeption.

  • In case of OutOfMemoryException, the event UnhandledException is fired.
  • In case of the StackOverFlowExeption, the event UnhandledException is not fired.
  • 26 September 2015

    How to change TFS credentials when using Visual Studio IDE

    One of my ex-colleague, was trying hard to change his saved user credential while connecting to his TFS source control from Visual Studio IDE. For some reason, he was suppose to change his TFS credentials which got saved when had connected to TFS earlier using someone else credentials. But we couldn't find out any option in Visual Studio to change his TFS credentials.

    After doing some googling, we come to know that, the Windows has stored the TFS credentials and supplying the same when tried to connect TFS, thereby he was not getting a prompt to use his new credentials to TFS.

    Later we removed the TFS credential which got saved to Windows Vault. Below are the steps to remove such Generic credential from Window 7 OS:

    1. Go to "Control Panel" and then to "User Accounts".
    2. Click on the "Manage Your Credentials" link present in the left. (You need to appropriate rights, to see it visible)
    3. Then in the view displayed, have a look at "Generic Credential" section.
    4. Locate your TFS address URL and click on expand option.
    5. Then to click on "Remove from Fault" link to remove the TFS credential from windows persistence.
    6. Generic Credential Persistence in Windows
    7. If you find another credential stored under "Windows Credentials" section with the same "Username", remove that one as well from the Vault.
    8. Windows Credential Persistence in Windows
    9. Close your Visual Studio (if running) and open again. Then try to connect to TFS, this time you will get a prompt to enter credentials.